Installation and Configuration Postfix Server on CentOS 7
Installation and Configuration of Postfix Server on CentOS 7/Red Hat 7


Postfix Server is a Mail Server on Linux base operating system in our case CentOS Linux 7. Postfix is open source Mail Server that use to transfer electronic mails.
Postfix package postfix is used as a Mail Transfer Agent (MTA) to send emails by use of Send Mail Transfer Protocol (SMTP port 25), Mail Delivery Agent (MDA) package dovecot is used to deliver emails to local mailboxes by use of Post Office Protocol (POP port 110 and POP3S port 995 ), Internet Message Access Protocol (IMAP port 143 and IMAPS port 993) and Mail User Agent Package mailx is use to sent mails from on email id to another email id.
Prerequisites of this Lab Environment
| S.no | Machine | Packages | Name/IP Address |
| 1. | Mail Server. | Postfix, Dovecot and Mailx. | Linux2/192.168.10.216 |
| 2. | OpenLDAP with DNS Server. | OpenLDAP and Bind. | OpenLDAP-DNS/192.168.10.215 |
Installation and Configuration of OpenLDAP Server with DNS Server on CentOS 7 Click on >> Read.
Mail Server:
To Check the IP address configuration file of Postfix server type the below command.
cat /etc/sysconfig/network-scripts/ifcfg-ens33

To check the host name and hosts file of Postfix Server type the below command.
hostnamecat /etc/hosts

Check the network connectivity of Postfix Server with OpenLDAP+DNS Server by use of ping command, also ping Postfix Server itself.
ping ldap-dns.pakistan.localping linux2.pakistan.local

OpenLDAP with DNS Server (OpenLDAP-DNS.Pakistan.Local):
Installation and Configuration of DNS Server For OpenLDAP Server on CentOS 7 click on >>Read.
Modify the forward and reverse lookup zone file that are forward.pakistan.local and reverse.pakistan.local respectively.
To enter in the directory "/var/named" of forward and reverse lookup zone file by use of cd command. The forward and reverse lookup zone files already created during the process of installation and configuration of DNS Server. ls command list the files and folders inside the directory.
cd /var/namedls

To edit or modify the forward lookup zone file that is pakistan.local.forward type the below command.
vi pakistan.local.forward

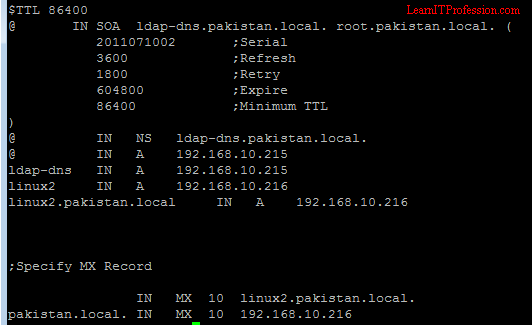
Add the below lines in pakistan.local.forward file.
$TTL 86400@ IN SOA ldap-dns.pakistan.local. root.pakistan.local. (2011071002 ;Serial3600 ;Refresh1800 ;Retry604800 ;Expire86400 ;Minimum TTL)@ IN NS ldap-dns.pakistan.local.@ IN A 192.168.10.215ldap-dns IN A 192.168.10.215linux2 IN A 192.168.10.216linux2.pakistan.local IN A 192.168.10.216;Specify MX RecordIN MX 10 linux2.pakistan.local.pakistan.local. IN MX 10 192.168.10.216

To edit or modify the reverse lookup zone file that is pakistan.local.reverse type the below command.
vi pakistan.local.reverse

Edit the below line in pakistan.local.reverse file.
$TTL 86400@ IN SOA ldap-dns.pakistan.local. root.pakistan.local. (2011071002 ;Serial3600 ;Refresh1800 ;Retry604800 ;Expire86400 ;Minimum TTL)@ IN NS ldap-dns.pakistan.local.ldap-dns IN A 192.168.10.215215 IN PTR ldap-dns.pakistan.local.216 IN PTR linux2.pakistan.local.

After edit the the forward and reverse lookup zone files reload zones by below command.
rndc reload

Mail Server (Postfix Server "Linux2.Pakistan.Local"):
To install the Postfix Server on CentOS Linux 7 type the below command.
yum install postfix* -y

Postfix Server on CentOS Linux 7 has successfully installed.

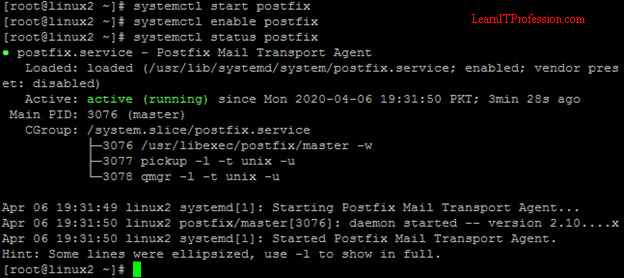
To Start, Enable and check the Status of Postfix Server service type the below commands.
systemctl start postfixsystemctl enable postfixsystemctl status postfix
Add firewall Rule of Send Mail Transfer Protocol (SMTP) on CentOS Linux 7 that require for Postfix (Mail Transfer Agent).
firewall-cmd --permanent --add-service=smtpfirewall-cmd --reload

For Postfix Configuration, Configure the "main.cf" file that available in "/etc/postfix/main.cf" directory by use of vi editor.
vi /etc/postfix/main.cf

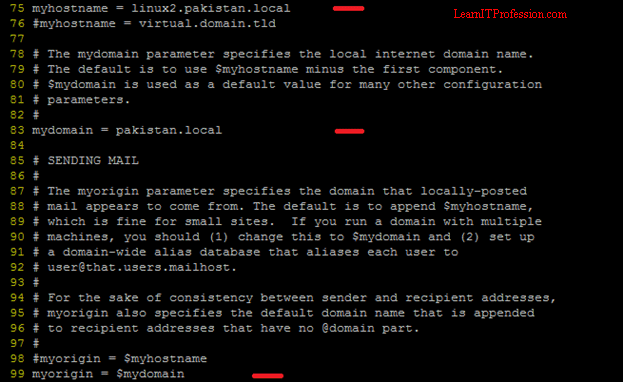
Modify the below lines in "main.cf" file to configure the Postfix Server Host Name, Domain Name and Set myorigin.
Line Number: 75myhostname = linux2.pakistan.localLine Number: 83mydomain = pakistan.localLine Number: 99myorigin = $mydomain

Modify the below lines to define the network by uncomment line number 113 to send and receive emails from anywhere and comment line number 116 because allow localhost interface is not require if we allow send and receive emails from anywhere in line number 113.
Line Number: 113inet_interfaces = allLine Number: 116#inet_interfaces = localhost

Set the mydestination by comment line number 164 and uncomment line number 166 with addition of "linux2.$mydomain" at the end of line number 166, as shown below.
Line Number: 164#mydestination = $myhostname, localhost.$mydomain, localhostLine Number: 166mydestination = $myhostname, localhost.$mydomain, localhost, $mydomain, linux2.$mydomain

Modify networks as shown below, you must configure your network.
Line Number: 264mynetworks = 192.168.10.0/24, 127.0.0.0/8

Set mail directory by uncomment line number 426, as shown below.
mail_spool_directory = /var/spool/mail

After configure the main configuration file "main.cf" of Postfix Server, Restart the Postfix Service.
systemctl restart postfix

Check the status of Postfix Service type the below command.
systemctl status postfix

Check the Send Mail Transfer Protocol (SMTP) that is listen or not after configure the main configuration file of Postfix Server.
netstat -tunlp | grep 25

To install the Dovecot package for Mail Delivery Agent type the below command.
yum install dovecot* -y

The dovecot package has successfully installed.

Configure "dovecot.conf" file that available in "/etc/dovecot/dovecot.conf" directory by use of vi editor.
vi /etc/dovecot/dovecot.conf

To Set the Protocols POP, IMAP and LMTP by uncomment the line number 24, as shown below.
Line Number: 24protocols = imap pop3 lmtp

After configure the Mail Delivery Agent "Dovecot", Restart and Enable the Dovecot Service by type the below commands.
systemctl restart dovecotsystemctl enable dovecot

Allow the firewall port POP3 and IMAP after configure the Mail Delivery Agent Dovecot.
firewall-cmd --permanent --add-port=110/tcpfirewall-cmd --permanent --add-port=143/tcpfirewall-cmd --reload

Final Step to Send email from user1 to user2 and reply from user2 to user1. User1 and User2 are OpenLDAP users of domain name pakistan.local.
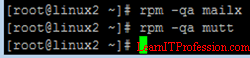
Check Mail User Agent package Mailx and Mutt are install to send emails between users by type the below command.
rpm –qa mailxrpm –qa mutt

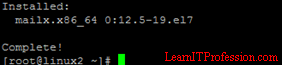
We will use Mail User Agent package Mailx to send emails between users. Install Mailx package type the below command.
yum install -y mailx

Mail User Agent package mailx has successfully installed.

Send and Receive Email on Postfix Server (Linux2.Pakistan.Local)
Send email from user1 to user2 with Domain Name type the below command. Write subject and Message then send email by type dot "." then enter.
mail -v user2@pakistan.local

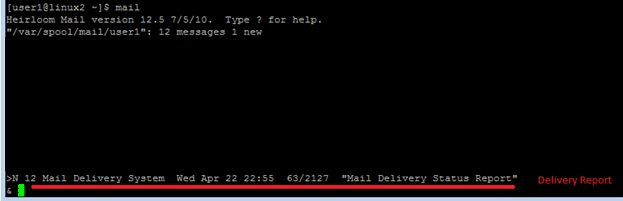
Check the status of mail on user1 mailbox by use of mail command.

Here number 12 is Mail Delivery status report. The Mail Delivery Status Report is fine that user1 send email to user2.

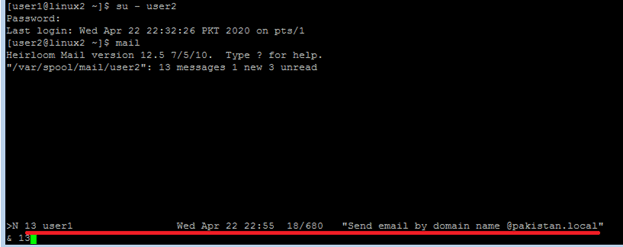
To Check email on user2 mailbox, First switch to user2 user id then use mail command to check email.
su - user2

The number is 13 that user1 send email to user2, Check the email write 13 then press enter. To reply the message type r then give message and send email by dot ".", for quit the Heirloom Mail type q then enter.

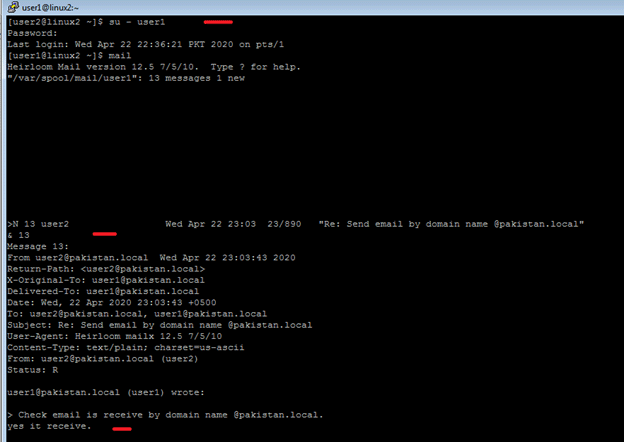
To check the email that user2 reply to user1, First switch to user1 then type mail command.
su - user1

The email number that user2 reply to user1 is 13. To check email type 13 then press enter, the reply message has received as shown in above diagram.
Send And Receive Email from Domain Join CentOS Linux 7 Client Computer By Use of Postfix Server Click on >>Read.
Thanks for read this Article
Comments
Post a Comment