Configure Distributed File System Namespace on Windows Server 2012 R2
Configure Distributed File System Namespace on Windows Server 2012 R2
In Distributed File System Namespace multiple shared folders of different server that locate in different locations is view with a single name.
Here we create a scenario that shared folder files of two different servers will view in a single name that is namespace and the shared folders replicate the files with each other. This is very useful scenario of organizations because if single server fail other server have all the data of shared folders.
Create a shared folder "Data1" on Server1 "VSRV01". In shared folder "Data1" we have created a file "File1".
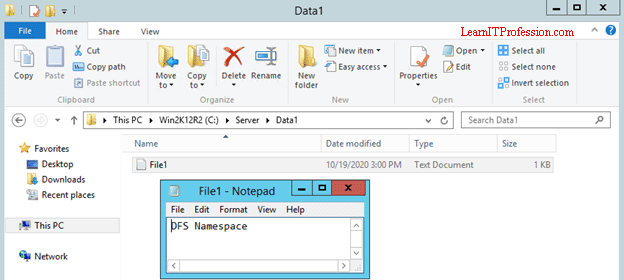

To verify the shared folder "Data1" type the below mention shared folder path on any system in a network.
\\vsrv01\data1

To verify the shared folder "Data2" type the below mention shared folder path on any system in a network.
\\vsrv02\data2

To create a namespace right click on "Namespaces" then click on "New Namespace".

Provide the name of server that will host the namespace. Here our namespace server is "vsrv02".

Enter the name of namespace that is "IT-Data", you can change the name as per your choice then click on "Edit Settings".

For share folder permissions choose "Use Custom Permissions" then click on "Customize".


After provide all the settings click on "Create".


To bind the target folder (shared folder) with namespace need to create a "New Folder". To create a new folder on namespace right click on namespace "\\VSRV-02\IT-Data" then click on "New Folder".

Provide the name of "New Folder" that is "System" and add the Folder Targets (Shared Folders) then click on "OK".


Click on "Next" to create a replication between Shared Folders.

The DFS Replication members has added automatically, click "Next" to process.

Provide the Primary member server "VSRV01".
Note: When replication will start, the shared folder of Server "VSRV01" will replicate all it's data to shared folder of Server "VSRV02" means after replication all the data inside shared folder of Server "VSRV02" will erase because Server "VSRV01" is primary member server, therefore take the backup of shared folder in Server "VSRV02" before replication. Once the replication will complete, move the backup data inside shared folder of Server "VSRV02" it will replicate to Server "VSRV01".

Select the topology of connection, we are selecting Full mesh.

Select the option "Replicate continuously using the specified bandwidth" then click "Next", you can select "Replicate during the specified days and times".

To complete the creation process of Replication Group click on "Create".


After successfully completed the process of Replication Group, It give the little note that has shown in below image. Replication will begin after configuration picked up by the members of replication group and depends on the Active Directory Domain Services Replication Latency.


Open the Namespace "\\VSRV02\IT-Data\System" on any client system, Here you can see after replication the shared folder data of Server "VSRV02" has removed.

To check the Folder Targets (Shared folders) and Replication Members in DFS Manager click on Name "System" in Namespace "//VSRV02/IT-Data".

Verify the location of Name "System" in namespace "\\VSRV02\IT-Data".

To check the replication of Shared Folders open the Task Manager then click on Ethernet available in Performance tab. The throughput is verifying that the replication has started.


Move the backup data in shared folder of Server "VSRV02".

After move the backup Data in Server "VSRV02" Shared folder, the data of shared folder Server "VSRV02" has replicated to Shared Folder Server "VSRV01".

Thanks for Read this Article
KING CASINO, LLC GIVES A $100 FREE BET
ReplyDeleteKING CASINO, LLC GIVES herzamanindir.com/ A $100 FREE BET to try. Visit gri-go.com us septcasino today and receive https://deccasino.com/review/merit-casino/ a $100 FREE BET! Sign up at our new site!